50 Percent wants to document how much women* are misrepresented as speakers at conferences, on panels, in talkshows and many other public events. At each event we count male and female speakers and publish the percentage of each – with your help!
It is a Rails application maintained by the rubymonstas.
sudo su - postgres # log in with the postgres user
psql # enter the Postgres database
CREATE ROLE yourusername; # create a new user
ALTER ROLE yourusername WITH LOGIN CREATEDB; # give necessary rights to database user
Make sure you have the correct Ruby version installed. We recommend Ruby Version Manager (RVM) (you can also use rbenv, but setup is more difficult). Also best uninstall any Ruby installation from your operating system as it might conflict. Run these commands to install RVM and switch to Ruby 2.4.2 which we use:
Once you made changes, you can run the tests with rake test.
The code can be deployed to production using cap production deploy. If you want to deploy a specific branch, use cap production deploy BRANCH=branchname
NLP Case Study – Amazon Fine Foods Review (Text Vectorization/Featurization Techniques)
Efficient sentence encoding and vectorization techniques with customer reviews on a product page of the popular E-Commerce website, Amazon using proven NLP techniques for the purpose of sentiment analysis. The resulting sentence vectors can be easily used with any popular linear/non-linear classification techniques, decision-tree based methods, ensemble methods or neural networks.
This is just an implementation of the state-of-the-art text featurization techniques.
Objective
Given a review, determine whether the review is positive (Rating of 4 or 5) or negative (rating of 1 or 2).
Since the product rating out of 5 is also given, we can use this score to deduce the posivity/negativity for ground truth. A rating of 4 or 5 could be cosnidered a positive review. A review of 1 or 2 could be considered negative. A review of 3 is nuetral and ignored. This is an approximate and proxy way of determining the polarity (positivity/negativity) of a review.
In order to load the data, We have used the SQLITE dataset as it easier to query the data and visualise the data efficiently.
Here as we only want to get the global sentiment of the recommendations (positive or negative), we will purposefully ignore all Scores equal to 3. If the score id above 3, then the recommendation wil be set to “positive”. Otherwise, it will be set to “negative”.
This plugin allows Moodle’s webservice interface to operate in a more RESTFul way.
Instead of each webservice call having a URL query parameter define what webservice function to use, webservice functions are made available by discrete URLS.
This makes it easier to integrate Moodle with modern interfaces that expect a RESTful interface from other systems.
This plugin also supports sending requests to Moodle webservices using the JSON format.
Finally, by default all Moodle webservice requests return the HTTP status code of 200 regardless of the success or failure of the call. This plugin will return 4XX series status codes if calls are malformed, missing data or unauthorised. This allows external services communicating with Moodle to determine the success or failure of a webservice call without the need to parse the body of the response.
Why make this Plugin?
There were two related reasons for making this plugin. The first was to solve a technical problem; interfacing Moodle to a service that required each Moodle webservice to be callable from a unique URL. The second was to advance the maturity of Moodle’s webservice interface.
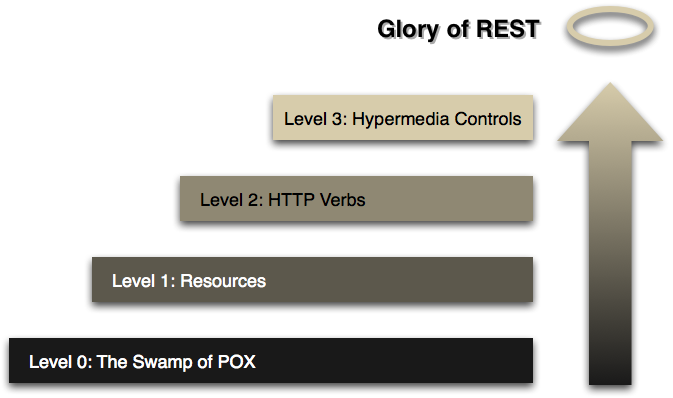
Moodle is currently Level 0 or in the “swamp of POX”. As described be Fowler, Moodle “is using HTTP as a tunneling mechanism for your own remote interaction mechanism”
This plugin aims to extend the maturity of Moodle’s webservice interface to “Level 1: Resources” by making each webservice function available as a discrete URL.
Supported Moodle Versions
Moodle version
Branch
Moodle 4.2 – 4.4
MOODLE_402_STABLE
Moodle 3.9 – 4.1
master
Moodle Plugin Installation
The following sections outline how to install the Moodle plugin.
Command Line Installation
To install the plugin in Moodle via the command line: (assumes a Linux based system)
Get the code from GitHub or the Moodle Plugin Directory.
Copy or clone code into: <moodledir>/webservice/restful
Run the upgrade: sudo -u www-data php admin/cli/upgradeNote: the user may be different to www-data on your system.
User Interface Installation
To install the plugin in Moodle via the Moodle User Interface:
Log into your Moodle as an Administrator.
Navigate to: Site administration > Plugins > Install Plugins
Install plugin from Moodle Plugin directory or via zip upload.
Moodle Plugin Setup
Once the plugin has been installed in Moodle, the following minimal setup is required:
Log into your Moodle as an Administrator.
Navigate to: Site administration > Plugins > Webservices > Manage protocols
Enable the RESTful protocol by clicking the “eye icon” in the enable column for this protocol.
Moodle Webservice Setup
Follow these instructions if you do not currently have any webservies enabled and/or unfamiliar with Moodle webservices.
There are several steps required to setup and enable webservices in Moodle, these are covered in the Moodle documentation that can be found at: https://docs.moodle.org/34/en/Using_web_services
It is recommended you read through these instructions first before attempting Moodle webservice Setup.
Accepted Content Types
Data can be sent to Moodle webservices using the following encodings:
application/json
application/xml
application/x-www-form-urlencoded
Use the ‘Content-Type’ HTTP header to notify Moodle which format is being used per request.
Returned Content Types
Data can be received from Moodle webservices using the following encodings:
application/json
application/xml
Use the ‘Accept’ HTTP header to notify Moodle which format to return per request.
Differences to Moodle Standard Webservice Interface
When using the RESTful plugin there are several differences to other Moodle webservice plugins, these are summarised below:
Webservice authorisation token as HTTP header
** Instead of being passed as a query parameter, authorisation tokens are passed using the ‘Authorization’ HTTP Header.
Moodle response format as HTTP header
** Instead of being passed as a query parameter, the desired Moodle response format ispassed using the ‘Accept’ HTTP Header.
Sample Webservice Calls
Below are several examples of how to structure requests using the cURL command line tool.
JSON Request
The following example uses the core_course_get_courses webservice function to get the course with id 6. The request sent to Moodle and the response received back are both in JSON format.
To use the below example against an actual Moodle instance:
Replace the {token} variable (including braces) with a valid Moodle authorisation token.
Relace localhost in the URL in the example with the domain of the Moodle instance you want to use.
The following example uses the core_course_get_courses webservice function to get the course with id 6. The request sent to Moodle and the response received back are both in XML format.
To use the below example against an actual Moodle instance:
Replace the {token} variable (including braces) with a valid Moodle authorisation token.
Relace localhost in the URL in the example with the domain of the Moodle instance you want to use.
The following example uses the core_course_get_courses webservice function to get the course with id 6. The request sent to Moodle is in REST format and the response received back is in JSON format.
NOTE: This plugin can only accept requests in REST format. Responses must be in JSON or XML format.
To use the below example against an actual Moodle instance:
Replace the {token} variable (including braces) with a valid Moodle authorisation token.
Relace localhost in the URL in the example with the domain of the Moodle instance you want to use.
This Moodle webservice plug-in allows for requests and responses to be different formats.
The following example uses the core_course_get_courses webservice function to get the course with id 6. The request sent to Moodle is in JSON format and the response received back is in XML format.
To use the below example against an actual Moodle instance:
Replace the {token} variable (including braces) with a valid Moodle authorisation token.
Relace localhost in the URL in the example with the domain of the Moodle instance you want to use.
The next big step will be to update the interface to “Level 2” that is support HTTP verbs, like get and post.
Which verb to use will likely be dependant on the ws function name that is being invoked.
This plugin allows Moodle’s webservice interface to operate in a more RESTFul way.
Instead of each webservice call having a URL query parameter define what webservice function to use, webservice functions are made available by discrete URLS.
This makes it easier to integrate Moodle with modern interfaces that expect a RESTful interface from other systems.
This plugin also supports sending requests to Moodle webservices using the JSON format.
Finally, by default all Moodle webservice requests return the HTTP status code of 200 regardless of the success or failure of the call. This plugin will return 4XX series status codes if calls are malformed, missing data or unauthorised. This allows external services communicating with Moodle to determine the success or failure of a webservice call without the need to parse the body of the response.
Why make this Plugin?
There were two related reasons for making this plugin. The first was to solve a technical problem; interfacing Moodle to a service that required each Moodle webservice to be callable from a unique URL. The second was to advance the maturity of Moodle’s webservice interface.
Moodle is currently Level 0 or in the “swamp of POX”. As described be Fowler, Moodle “is using HTTP as a tunneling mechanism for your own remote interaction mechanism”
This plugin aims to extend the maturity of Moodle’s webservice interface to “Level 1: Resources” by making each webservice function available as a discrete URL.
Supported Moodle Versions
Moodle version
Branch
Moodle 4.2 – 4.4
MOODLE_402_STABLE
Moodle 3.9 – 4.1
master
Moodle Plugin Installation
The following sections outline how to install the Moodle plugin.
Command Line Installation
To install the plugin in Moodle via the command line: (assumes a Linux based system)
Get the code from GitHub or the Moodle Plugin Directory.
Copy or clone code into: <moodledir>/webservice/restful
Run the upgrade: sudo -u www-data php admin/cli/upgradeNote: the user may be different to www-data on your system.
User Interface Installation
To install the plugin in Moodle via the Moodle User Interface:
Log into your Moodle as an Administrator.
Navigate to: Site administration > Plugins > Install Plugins
Install plugin from Moodle Plugin directory or via zip upload.
Moodle Plugin Setup
Once the plugin has been installed in Moodle, the following minimal setup is required:
Log into your Moodle as an Administrator.
Navigate to: Site administration > Plugins > Webservices > Manage protocols
Enable the RESTful protocol by clicking the “eye icon” in the enable column for this protocol.
Moodle Webservice Setup
Follow these instructions if you do not currently have any webservies enabled and/or unfamiliar with Moodle webservices.
There are several steps required to setup and enable webservices in Moodle, these are covered in the Moodle documentation that can be found at: https://docs.moodle.org/34/en/Using_web_services
It is recommended you read through these instructions first before attempting Moodle webservice Setup.
Accepted Content Types
Data can be sent to Moodle webservices using the following encodings:
application/json
application/xml
application/x-www-form-urlencoded
Use the ‘Content-Type’ HTTP header to notify Moodle which format is being used per request.
Returned Content Types
Data can be received from Moodle webservices using the following encodings:
application/json
application/xml
Use the ‘Accept’ HTTP header to notify Moodle which format to return per request.
Differences to Moodle Standard Webservice Interface
When using the RESTful plugin there are several differences to other Moodle webservice plugins, these are summarised below:
Webservice authorisation token as HTTP header
** Instead of being passed as a query parameter, authorisation tokens are passed using the ‘Authorization’ HTTP Header.
Moodle response format as HTTP header
** Instead of being passed as a query parameter, the desired Moodle response format ispassed using the ‘Accept’ HTTP Header.
Sample Webservice Calls
Below are several examples of how to structure requests using the cURL command line tool.
JSON Request
The following example uses the core_course_get_courses webservice function to get the course with id 6. The request sent to Moodle and the response received back are both in JSON format.
To use the below example against an actual Moodle instance:
Replace the {token} variable (including braces) with a valid Moodle authorisation token.
Relace localhost in the URL in the example with the domain of the Moodle instance you want to use.
The following example uses the core_course_get_courses webservice function to get the course with id 6. The request sent to Moodle and the response received back are both in XML format.
To use the below example against an actual Moodle instance:
Replace the {token} variable (including braces) with a valid Moodle authorisation token.
Relace localhost in the URL in the example with the domain of the Moodle instance you want to use.
The following example uses the core_course_get_courses webservice function to get the course with id 6. The request sent to Moodle is in REST format and the response received back is in JSON format.
NOTE: This plugin can only accept requests in REST format. Responses must be in JSON or XML format.
To use the below example against an actual Moodle instance:
Replace the {token} variable (including braces) with a valid Moodle authorisation token.
Relace localhost in the URL in the example with the domain of the Moodle instance you want to use.
This Moodle webservice plug-in allows for requests and responses to be different formats.
The following example uses the core_course_get_courses webservice function to get the course with id 6. The request sent to Moodle is in JSON format and the response received back is in XML format.
To use the below example against an actual Moodle instance:
Replace the {token} variable (including braces) with a valid Moodle authorisation token.
Relace localhost in the URL in the example with the domain of the Moodle instance you want to use.
The next big step will be to update the interface to “Level 2” that is support HTTP verbs, like get and post.
Which verb to use will likely be dependant on the ws function name that is being invoked.
The sample docker-compose.yml can be used by simply running docker-compose up -d or the port can be altered by changing the mapping according to the Docker Port Specification. Set the environment variables with your Mastercard Payment Gateway Services information.
API Specification
Client Authentication is handled in the Auth method of the handlers.go file. By default this is a Header of “APIKEY” with a value of “TESTSDK”. Feel free to modify this if necessary.
All service calls responsible for handling payment information should use best-in-class security practices. This software is intended for TEST / DEVELOPMENT purposes ONLY and is not intended to be used in a production environment. This app should only serve to satisfy the following use cases:
As a complimentary tool for the sample mobile apps when demonstrating functionality.
As a stop-gap solution for developers integrating their apps with the mobile SDKs and do not yet have service components in place to support an entire transaction lifecycle.
Runs the app in the development mode.
Open http://localhost:3000 to view it in your browser.
The page will reload when you make changes.
You may also see any lint errors in the console.
npm test
Launches the test runner in the interactive watch mode.
See the section about running tests for more information.
npm run build
Builds the app for production to the build folder.
It correctly bundles React in production mode and optimizes the build for the best performance.
The build is minified and the filenames include the hashes.
Your app is ready to be deployed!
See the section about deployment for more information.
npm run eject
Note: this is a one-way operation. Once you eject, you can’t go back!
If you aren’t satisfied with the build tool and configuration choices, you can eject at any time. This command will remove the single build dependency from your project.
Instead, it will copy all the configuration files and the transitive dependencies (webpack, Babel, ESLint, etc) right into your project so you have full control over them. All of the commands except eject will still work, but they will point to the copied scripts so you can tweak them. At this point you’re on your own.
You don’t have to ever use eject. The curated feature set is suitable for small and middle deployments, and you shouldn’t feel obligated to use this feature. However we understand that this tool wouldn’t be useful if you couldn’t customize it when you are ready for it.
If you follow the Pluralsight course with the most recent versions of Backbone, Mongoskin and Marionette you will quickly run into trouble as those libraries has evolved over time. Unfortunatelly, the application on Rob’s repository was not upgraded since then.
While I was fallowing the course, I’ve upgraded parts of the application to use the newest Backbone.js v1.3.3 at this time. Also updating parts of Mongoskin as access to MongoDb has slightly changed.
MarionetteJS
There is no code for MarionetteJS part in Rob’s repo. I’ve implemented it following the last section using the latest MarionetteJS v3.3.1, but there were some noticable differences between the current version and one used in the videos.
Other changes
As I said most important changes were in BackboneJS and MarionetteJS but also many changes were done to Mongoskin and Express. I’ve also replaced Jade view engine by Pug with some minor changes in the syntax.


 https://github.com/rubymonsters/fiftypercent