Streamlit project to test Selenium running in Streamlit Cloud runtime.
Local Windows 10 machine works
Local Docker container works
Streamlit Cloud runtime works, see example app here:
Issues 🐛
Example fails on Streamlit Cloud with a TimeoutException, due to a 403 response, because GeoIP blocking is active on the target website. Therefore a proxy can be enabled optionally to bypass this.
However, the proxies are not very reliable, because only free proxies are used here. Therefore, the example is not very stable with enabled proxies and can fail sometimes. Sometimes, no proxies are available.
ToDo ☑️
improve example
fix proxy issues
try also undetected_chromedriver package
try also seleniumbase package
Problem 🤔
The suggestion for this repo came from a post on the Streamlit Community Forum.
It is not that easy to install and use Selenium based webscraper in container based environments.
On the local computer, this usually works much more smoothly because a browser is already installed and can be controlled by the associated webdriver.
In container-based environments, however, headless operation is mandatory because no UI can be used there.
Therefore, in this repository a small example is given to get Selenium working on:
Local Windows 10 machine
Local Docker container that mimics the Streamlit Cloud runtime
Streamlit Community Cloud runtime
Proxy 😎
Because some websites block requests based on countries (aka geoip blocking) or from certain IP ranges, a proxy can be used to bypass this. The example app has a checkbox to enable a proxy. You can choose between socks4 and socks5 proxies. However, socks4 does not work at all. The socks5 proxy is a free socks5 proxy from a public list and is not very reliable. Therefore, the example is not very stable with enabled proxies and can fail quite often.
Pitfalls 🚩
To use Selenium (even headless in a container) you need always two components to be installed on your machine:
A webbrowser and its associated webdriver.
The version of the headless webbrowser and its associated webdriver must always match.
If your are using Selenium in a docker container or on Streamlit Cloud, the --headless option is mandatory, because there is no graphical user interface available.
There are three options of webbrowser/webdriver combinations for Selenium:
chrome & chromedriver
chromium & chromedriver
firefox & geckodriver
Unfortunately in the default Debian Bullseye apt package repositories, not all of these packages are available. If we want an installation from the default repositories, only chromium & chromedriver is left.
The chromedriver has a lot of options, that can be set. It may be necessary to tweak these options on different platforms to make headless operation work.
The chromedriver, selenium and its options change quite a lot over time. A lot of information on stackoverflow regarding chromedriver/selenium is outdated.
The deployment to Streamlit Cloud has unfortunately failed sometimes in the past. A concrete cause of the error or an informative error message could not be identified. Currently it seems to be stable on Streamlit Cloud.
To run this streamlit app on Windows, the Windows chromedriver.exe must be stored here in the root folder or added to the Windows PATH. Be aware, that the version of this chromedriver must match the version of your installed Chrome browser.
Development Setup 🛠️
In the Streamlit Cloud runtime, neither chrome, chromedriver nor geckodriver are available in the default apt package sources.
The Streamlit Cloud runtime seems to be very similar to the official docker image python:3.XX-slim-bullseye on Docker Hub, which is based on Debian Bullseye.
In this repository a Dockerfile is provided that mimics the Streamlit Cloud runtime. It can be used for local testing.
A packages.txt is provided with the following minimal content:
chromium
chromium-driver
A requirements.txt is provided with the following minimal content:
streamlit
selenium
Docker 🐋
Docker Container local
The provided Dockerfile tries to mimic the Streamlit Cloud runtime.
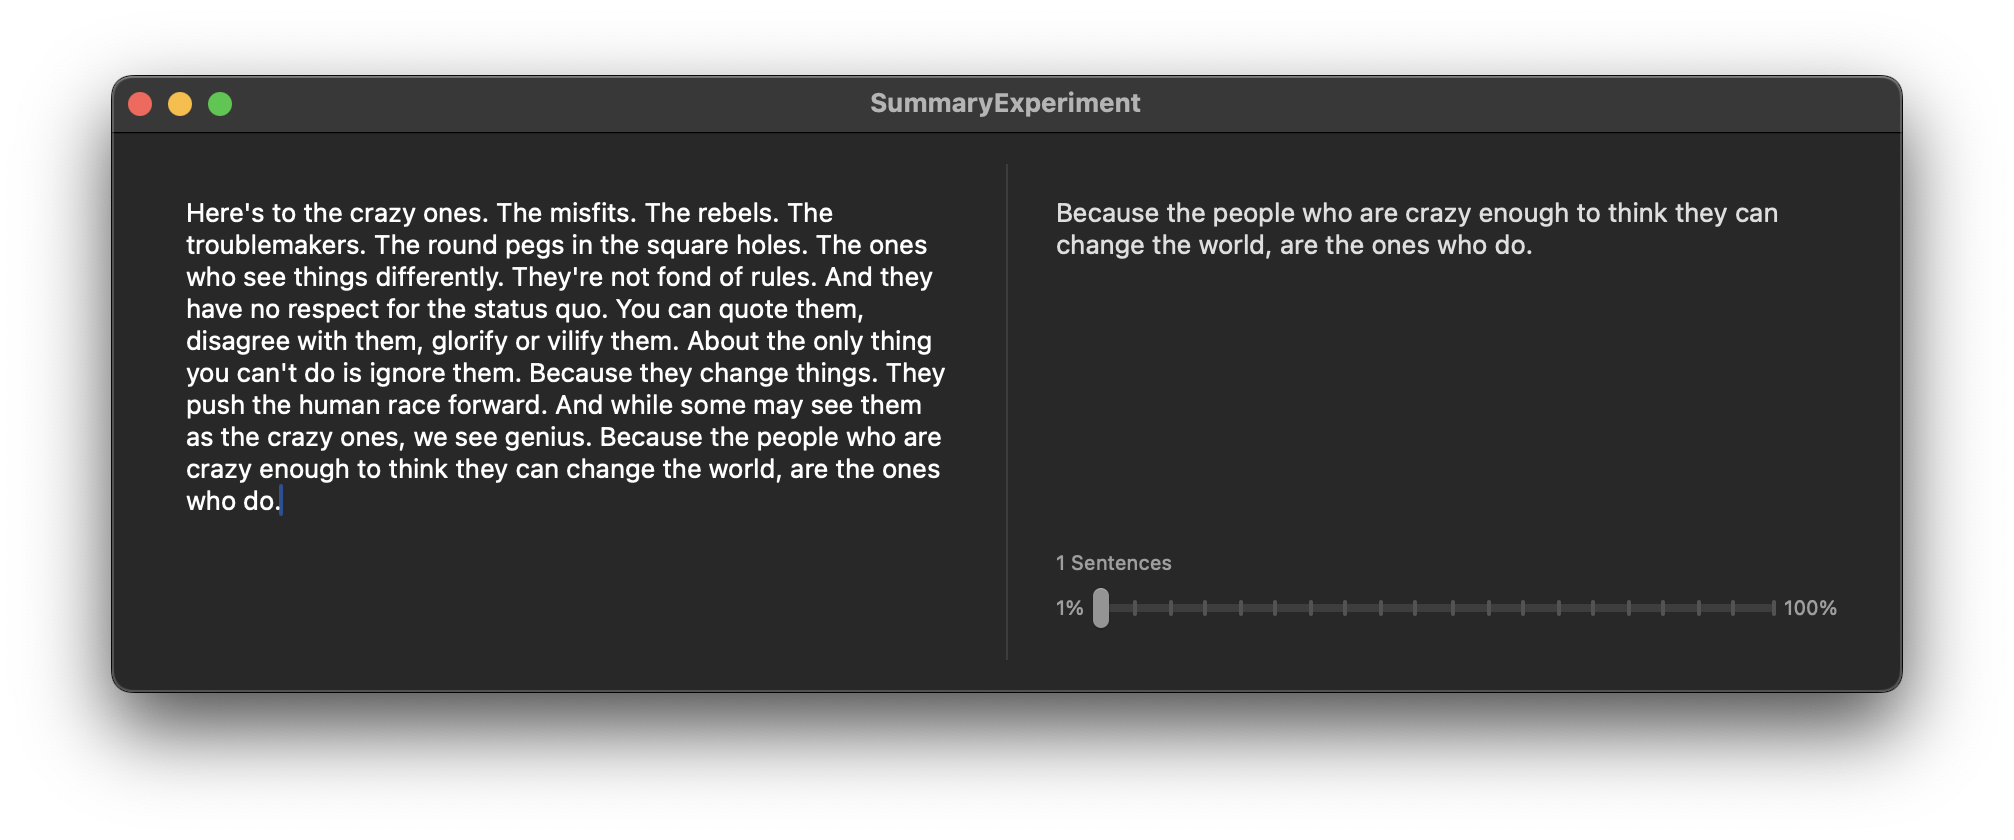
SwiftSummarize is the easiest way to create a summary from a String. Internally it’s a simple wrapper around CoreServices SKSummary
Before
Here’s to the crazy ones. The misfits. The rebels. The troublemakers. The round pegs in the square holes. The ones who see things differently. They’re not fond of rules. And they have no respect for the status quo. You can quote them, disagree with them, glorify or vilify them. About the only thing you can’t do is ignore them. Because they change things. They push the human race forward. And while some may see them as the crazy ones, we see genius. Because the people who are crazy enough to think they can change the world, are the ones who do.
After
Because the people who are crazy enough to think they can change the world, are the ones who do
Install
Add this url to your dependencies:
https://github.com/StefKors/SwiftSummarize
Example
letinput="""Here's to the crazy ones. The misfits. The rebels. The troublemakers. Theround pegs in the square holes. The ones who see things differently. They're notfond of rules. And they have no respect for the status quo. You can quote them,disagree with them, glorify or vilify them. About the only thing you can't do is ignorethem. Because they change things. They push the human race forward. And while somemay see them as the crazy ones, we see genius. Because the people who are crazyenough to think they can change the world, are the ones who do. """letsummary=Summary(text, numberOfSentences:1)print(summary.output)
// Because the people who are crazy enough to think they can change the world, are the ones who do
Or use it directly on Strings with the extension
letinput="""Here's to the crazy ones. The misfits. The rebels. The troublemakers. Theround pegs in the square holes. The ones who see things differently. They're notfond of rules. And they have no respect for the status quo. You can quote them,disagree with them, glorify or vilify them. About the only thing you can't do is ignorethem. Because they change things. They push the human race forward. And while somemay see them as the crazy ones, we see genius. Because the people who are crazyenough to think they can change the world, are the ones who do. """letoutput= input.summarize(numberOfSentences:1)print(output)
// Because the people who are crazy enough to think they can change the world, are the ones who do
MoGliFC is an STM32H743-based flight controller for quadcopters (‘drones’) as well as aircraft with wings.
Winged aircraft typically require servos to be connected to the flight controller while copters
typically have no such requirement.
Quadcopter and Wing
MoGliFC addresses both use-cases by providing a scored extension board for the servo connectors which
also holds the BEC for the servos. When removed, the signal outputs remain on the flight controller and
are available e.g. as GPIOs, UARTs or PWM outputs.
To enable a “Full Stack” solution for drones incorporating also a dedicated ESC daughter board, the design
goal of MoGliFC is such that off-the-shelf ESC boards can be used. (outlook: custom ESC board for MoGliFC with advanced features)
CAN-FD and Debug
The second extension option is a larger frame which allows the MoGliFC to be placed in a BOPLA ALUBOS housing
with the USB interface as well es the CAN/CAN-FD externally available turning the MogliFC into a general
purpose CAN-FD interface. This second extension also holds a SWD (single wire debug) interface for easy debugging.
Current Sensor (50A continuous, 160A peak) (Wing/Debug only)
Battery Voltage Sensor: 1K:10K (INAV Scale 1100)
Mechanics
Mounting: 30.5 x 30.5mm, Φ4mm with grommets Φ3mm
Dimension: 54 x 36 x 13 mm (wing); 36 x 36 x 13 mm (quad)
Weight: XXg (Quad: XXg, Wing: YYg)
Documentation
Setup, installation
…
Hardware
Software
Tools
…
Contributing
Contributions are welcome and encouraged. You can contribute in many ways:
Documentation updates and corrections.
How-To guides – received help? help others!
Bug fixes.
New features.
Telling us your ideas and suggestions.
Buying your hardware from this
Github issue tracker is a good place to search for existing issues or report a new bug/feature request:
Before creating new issues please check to see if there is an existing one!
For file based installation, add netlify-plugin-cypress NPM package as a dev dependency to your repository.
npm install --save-dev netlify-plugin-cypress
# or
yarn add -D netlify-plugin-cypress
And then add the plugin’s name to the list of build plugins in netlify.toml file as shown in the examples below.
note: this plugin assumes you have already installed Cypress as a dev NPM dependency.
Chromium install
This plugin installs via Puppeteer Chromium browser, which is also cached inside ./node_modules folder.
How does it work
Build steps
When Netlify Build system runs it performs 2 steps essentially:
builds the site
deploys the site
Every plugin that wants to perform some actions can do so before the build, after the build (but before the deploy), and after the deploy. The Netlify uses the following names for these events
"preBuild"
1. builds the site
"postBuild"
2. deploys the site
"onSuccess"
"onFailure"
Thus every plugin can register itself to be executed before a site is built using “preBuild” event, or after a successful deploy using “onSuccess” event name, etc.
This plugin
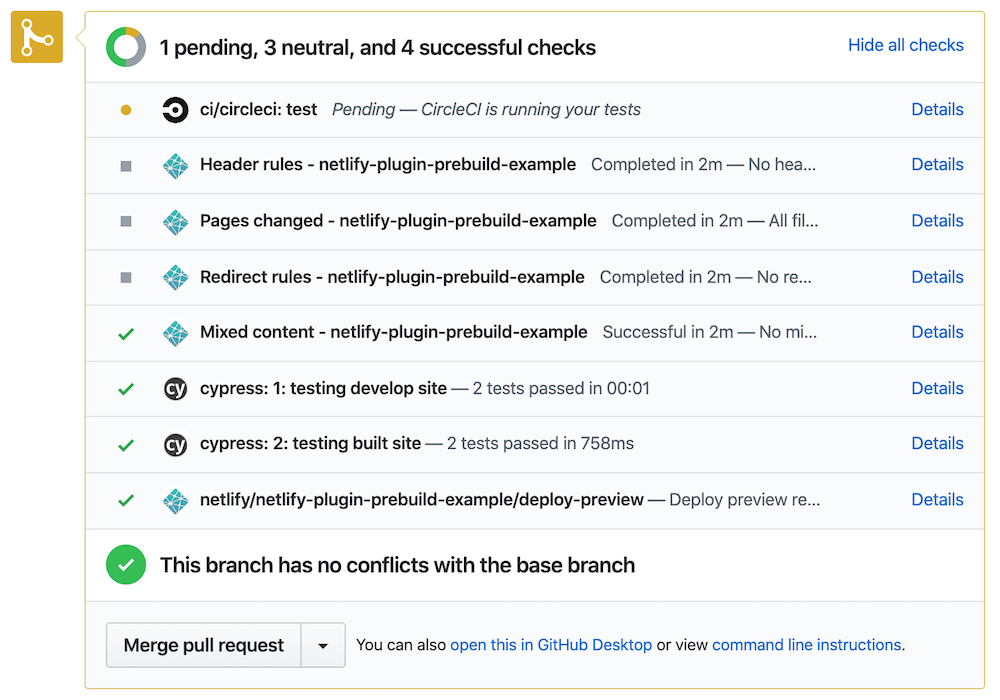
This plugin netlify-plugin-cypress by default runs during the “onSuccess” event, testing the deployed site. The Netlify Build system gives the URL to the plugin and it runs Cypress against that URL using the Cypress NPM module API.
Optionally, you can also run tests during “preBuild” and “postBuild” steps. This is useful if you want to ensure the site is working even before deploying it to Netlify servers. Finally, this plugin does not use “onFailure” event which happens only if Netlify fails to deploy the site.
Failing the deploy
Running Cypress tests by default uses the “onSuccess” step of the build pipeline. By this point Netlify has already deployed the site. Even if the tests fail now, the Netlify shows the successful deployment – the site is live! To really prevent the broken deploys, we suggest using Cypress GitHub / GitLab / Bitbucket integration to fail the status checks on a pull request.
We also suggest running tests during the “preBuild” and/or “postBuild” steps. If the tests fail during these steps, the Netlify fails the entire build and does not deploy the broken site.
Finally, you can set up Slack notifications on failed tests against the deployed site. At least you will quickly find out if the deployed site fails the E2E tests and would be able to roll back the deploy.
Examples
basic
Here is the most basic Netlify config filenetlify.toml with just the Cypress plugin
[[plugins]]
# runs Cypress tests against the deployed URLpackage = "netlify-plugin-cypress"
The example file above should be enough to run Cypress tests in any existing Netlify project.
recommended
We strongly recommend setting CYPRESS_CACHE_FOLDER to place the Cypress binary inside the node_modules folder to cache it between builds
# explicit commands for building the site# and the folder to publish
[build]
command = "npm run build"publish = "build"
[build.environment]
# cache Cypress binary in local "node_modules" folder# so Netlify caches itCYPRESS_CACHE_FOLDER = "./node_modules/CypressBinary"# set TERM variable for terminal outputTERM = "xterm"
[[plugins]]
# runs Cypress tests against the deployed URLpackage = "netlify-plugin-cypress"
Typescript users may need to add a install before the build command. For a yarn user with a typescript app, the build section of the Netlify configuration might look like this:
Note: if any tests against the deployed URL fail, the Netlify build still considers it a success. Thus if you want to have a test check against the deploy, install Cypress GitHub App. The app will provide its own failing status check in this case.
options
You can control the browser, the specs to run, record tests on Cypress Dashboard, etc, see manifest.yml file.
recording
To record test results and artifacts on Cypress Dashboard, set record: true plugin input and set CYPRESS_RECORD_KEY as an environment variable via Netlify Deploy settings.
[build]command = "npm run build"publish = "build"[build.environment]# cache Cypress binary in local "node_modules" folder# so Netlify caches itCYPRESS_CACHE_FOLDER = "./node_modules/CypressBinary"# set TERM variable for terminal outputTERM = "xterm"[[plugins]]# runs Cypress tests against the deployed URLpackage = "netlify-plugin-cypress"[plugins.inputs]record = true
Security note 🔐: you should keep your CYPRESS_RECORD_KEY secret. You can control how Netlify builds external pull requests, see the doc – you never want to expose sensitive environment variables to outside builds.
You can change the group name for the recorded run using group parameter
[[plugins]]
# runs Cypress tests against the deployed URLpackage = "netlify-plugin-cypress"
[plugins.inputs]
record = truegroup = "built site"
tag
You can give recorded run tags using a comma-separated string. If the tag is not specified, Netlify context will be used (production, deploy-preview or branch-deploy)
[[plugins]]
# runs Cypress tests against the deployed URLpackage = "netlify-plugin-cypress"
[plugins.inputs]
record = truegroup = "built site"tag = "nightly,production"
spec
Run only a single spec or specs matching a wildcard
[build]
command = "npm run build"publish = "build"
[build.environment]
# cache Cypress binary in local "node_modules" folder# so Netlify caches itCYPRESS_CACHE_FOLDER = "./node_modules/CypressBinary"# set TERM variable for terminal outputTERM = "xterm"
[[plugins]]
# runs Cypress tests against the deployed URLpackage = "netlify-plugin-cypress"
[plugins.inputs]
spec = "cypress/integration/smoke*.js"
By default all tests run using the Chromium browser. If you want to use Electron:
[build]
command = "npm run build"publish = "build"
[build.environment]
# cache Cypress binary in local "node_modules" folder# so Netlify caches itCYPRESS_CACHE_FOLDER = "./node_modules/CypressBinary"# set TERM variable for terminal outputTERM = "xterm"
[[plugins]]
package = "netlify-plugin-cypress"
[plugins.inputs]
# allowed values: electron, chromiumbrowser = "electron"
configFile
If you would like to use a different Cypress config file instead of cypress.json, specify it using the configFile option
[build]
command = "npm run build"publish = "build"
[build.environment]
# cache Cypress binary in local "node_modules" folder# so Netlify caches itCYPRESS_CACHE_FOLDER = "./node_modules/CypressBinary"# set TERM variable for terminal outputTERM = "xterm"
[[plugins]]
package = "netlify-plugin-cypress"
[plugins.inputs]
configFile = "cypress.netlify.config.js"
testing SPA routes
SPAs need catch-all redirect setup to make non-root paths accessible by tests. You can enable this with spa parameter.
[[plugins]]
# local Cypress plugin will test our site after it is built
package = "netlify-plugin-cypress"
  [plugins.inputs]
  # can also use "spa = true" to use "index.html" by default
  spa = "index.html"
By default this plugin tests static site after deploy. But maybe you want to run end-to-end tests against the local development server. You can start the local server, wait for it to respond and then run Cypress tests by passing parameters to this plugin. Here is a sample config file
[[plugins]]
package = "netlify-plugin-cypress"# let's run tests against development server# before building it (and testing the built site)
[plugins.inputs.preBuild]
enable = truestart = 'npm start'wait-on = 'http://localhost:3000'wait-on-timeout = '30'# seconds
Parameters you can place into preBuild inputs: start, wait-on, wait-on-timeout, spec, record, group, and tag.
By default this plugin tests static site after deploy. But maybe you want to run end-to-end tests locally after building the static site. Cypress includes a local static server for this case but you can specify your own command if needed by using the start argument. Here is a sample config file
[[plugins]]
package = "netlify-plugin-cypress"# let's run tests against the built site
[plugins.inputs.postBuild]
enable = true
Parameters you can place into postBuild inputs: spec, record, group, tag, start and spa.
The SPA parameter
If your site requires all unknown URLs to redirect back to the index page, use the spa parameter
[[plugins]]
package = "netlify-plugin-cypress"# let's run tests against the built site
[plugins.inputs.postBuild]
enable = true# must allow our test server to redirect unknown routes to "https://github.com/"# so that client-side routing can correctly route them# can be set to true or "index.html" (or similar fallback filename in the built folder)spa = truestart = 'npm start'
Even better when testing the prebuilt site is to run the Netlify CLI to make sure the local API redirects and Netlify functions work in addition to the web site. Add netlify-cli as a dev dependency and start it during testing.
If you are testing the site before building it and want to skip testing the deployed URL
[[plugins]]
package = "netlify-plugin-cypress"# do not test the deployed URL
[plugins.inputs]
enable = false# test the local site
[plugins.inputs.preBuild]
enable = true
parallelization
Running tests in parallel is not supported because Netlify plugin system runs on a single machine. Thus you can record the tests on Cypress Dashboard, but not run tests in parallel. If Netlify expands its build offering by allowing multiple build machines, we could take advantage of it and run tests in parallel.
HTML files
When serving the built folder, we automatically serve .html files. For example, if your folder has the following structure:
public/
  index.html
  pages/
    about.html
The public folder is served automatically and the following test successfully visits both the root and the about.html pages:
cy.visit("https://github.com/")cy.visit('/pages/about')// visits the about.html
The default browser has been switched to Chromium. If you want to use the built-in Electron use an explicit option browser
We have changed the default testing phase. In v1 the tests executed after building the site by default. In v2 the tests run against the deployed URL by default, and you need to enable the testing during preBuild or postBuild steps.
Debugging
Set environment variable DEBUG=netlify-plugin-cypress to see the debug logs. To see even more information, set DEBUG=netlify-plugin-cypress,netlify-plugin-cypress:verbose
Warning: be careful with verbose logging, since it can print all environment variables passed to the plugin, including tokens, API keys, and other secrets.
Common problems
Too many progress messages while installing Cypress
If you see A LOT of progress messages during “npm install” step, set an environment
variable during build CI = 1 to remove them.
Cypress binary is installed on every build
By default Cypress binary is installed in the home folder, see caching.
Netlify build does NOT cache this folder, but it DOES cache the local “node_modules” folder.
Tell Cypress to install its binary in the “node_modules” folder by setting build environment
variable CYPRESS_CACHE_FOLDER = "./node_modules/CypressBinary".
Several versions of Cypress are installed according to the build logs
From the Netlify UI under Deploys, pick “Trigger Deploy” and select “Clear cache and deploy site”. This should cleanly install new “node_modules” and remove old Cypress versions.
Term message warnings in the Cypress output
If you see messages like tput: No value for $TERM and no -T specified during
Cypress run, add an environment variable TERM = xterm.
Electron browser crashes while running tests
Switch to using Chromium browser that seems to be a bit more reliable. Use browser = "chromium" setting.
You want to skip Puppeteer download
If you do not plan on using Chromium to run the tests, if you want to use the built-in Electron browser, you can save time by skipping the Puppeteer download. Set the environment variable PUPPETEER_SKIP_DOWNLOAD = 1 on your CI.
License
This project is licensed under the terms of the MIT license.
--with-logging
	Redirect stdout and stderr to log files to standard brew path.
--with-purify
    Build purify plugin.
--with-tmp-logging
	Redirect stdout and stderr to /tmp.
--without-border
	Do not build border plugin.
--without-ffm
	Do not build focus-follow-mouse plugin.
--without-tiling
	Do not build tiling plugin.
--HEAD
	Install HEAD version
Caveats
Copy the example configuration into your home directory:
(make-graph '((01) (02) (12))) ;; an undirected trianglular graph
(make-graph '((01) (12) (20)) t) ;; directed triangular graph
(directedp g) ;; is graph directed or undirected?
(graph-directed-edge-p g i1 i1) ;; t if an edge exists from i1 to i2
(setf (graph-direvted-edge-p g i1 i1) t) ;; connects i1 to i2
(graph-vertex-count g) ;; returns # of verticies
(vertex-paths g v1 v2 &key (max-steps -1) (ignorenil))
;; returns a list of paths, where each path is a list of verticies starting at v1 and ending in v2
(coerce-to-undirected-graph g) ;; adds reverse edges to a directed graph, making it undirected
(graph-add-edges g edge-specs)
(graph-delete-edges g edge-specs)
(graph-extend-verticies g n) ;; adds n unconnected verticies to the graph
(graph-delete-verticies g vlist &keynot)
(graph-delete-verticies-if g pred &keynot)
(graph-add-graph g1 g2 &optional g1-g2-edges g2-g2-edges)
;; adds two graphs and new edges between the two graphs;; e.g., (graph-add-graph g1 g2 :g1-g2-edges '((0 1)) :g2-g1-edges'((10)))
;; creates an undirected edge between g1vertex 0 to g2vertex 1
(matrix-of g) ;; gets the underlying bit matrix representing the graph
(reorder-graph g #(2301)) ;; returns a new graph with same structure;; but with verticies reordered
(transpose g) ;; destructively transpose graph g - reverses directed edges
(unconnected-subgraphs g &key (verticies t) output-connected-p)
;; Returns a list of subgraphs of g which are disconnected from each other.;; G is a graph;; OUTPUT-CONNECTED is a boolean which if set causes the function to consider;; verticies to be connected when they share an output vertex. This setting;; only has meaning for directed graphs, since all edges in undirected graphs ;; are bidirectional. If OUTPUT-CONNECTED-P is NIL, shared output verticies do;; not cause their inputs to be in a connected group; the s
(connected-vertex-groups g &key (verticies t) (max-steps -1) (ignorenil))
;; computes the sets of verticies which are connected (by output edges)
Ullman subgraph isomorphism functions
Graphs are represented as bitmatricies (vectors of integers treated as bitfields)
find-subgraph-isomorphisms
(find-subgraph-isomorphisms s g &key base-map continue-if vertex-test row-fn)
Returns a list of where each element represents a subgraph isomorphism.
Required arguments:
s – subgraph to find g – graph to search
Optional arguments:
base-map – allowed mappings from subgraph s verticies to graph g verticies. This parameter can be used to only allow matches between particular verticies. This is a vector where each index represents the corresponding vertex in the subgraph s, and the value is a bitmatrix where each set bit represents an allowed isomorphism to the graph g. An entry containing all bits set means that all mappings are possible; An entry where all bits are 0 means that no mappings are possible between that subgraph vertex and any graph vertex.
continue-if – lambda which which takes an isomorphism as an argument and returns two booleans (continuep collectp). If collectp is true, the isomorphism is added to the list of returned isomorphisms. If continuep is true, search continues for more isomorphisms.
vertex-test – predicate used to limit which vertexes in s can match to vertexes in g. It takes arguments (s svertex g gvertex), where s and g are the subgraph and graph and verticies being tests, and returns NIL if svertex cannot map to gvertex.
row-fn – is an alternative way of computing which mappings are possible, and takes arguments (s svertex g) and returns an integer bitfield representing the indicies of g to which svertex may be mapped.
Note: if neither vertex-test nor row-fn are provided, a default vertex-test is used which only allows sverticies to map to gverticies with an equal or greater number of outgoing edges.
find-subgraph-isomorphism-maps
(find-subgraph-isomorphism-maps s g &key base-map (continue-if t) vertex-test row-fn)
Identical to find-subgraph-isomorphisms, but returns a list of bit-vectors instead of a list of integer vectors. Useful if you want to avoid the additional overhead of translating from bit-vectors to integer arrays.
mikrotik-exporter is a Prometheus exporter written in Go with the goal to export all possible metrics from MikroTik devices.
It is not predetermined which metrics are collected, you can create your own modules.
Some modules are shipped with the program, see here.
Info – RouterOS v7
The logic supports RouterOS v7, but not all modules have been adapted to the new command structure and parameter names.
Probing
Targets can be probed by requesting:
http://localhost:9436/probe?target=xxx
The modules defined at the target configuration can be overwritten via the query string:
# either param_name or value must be set[ param_name: <string> ]# static value for this param[ value: <template_string> ]# value used if not found in API response[ default: <template_string> ]# only relevant for param_type = datetime[ datetime_type: tonow / fromnow / timestamp | default = fromnow ]# only relevant for param_type = bool[ negate: <bool> ]# remapping is stopped after the first match in remap_values or remap_values_re# remapping to null, stops further processing of this parameterremap_values:
[ <string>: <string> / null ]remap_values_re:
[ <regex>: <string> / null ]
<metric>
# derives from param<param>[ param_type: int / bool / timespan / datetime | default = int]# either metric_name or param_name must be set[ metric_name: <string> | default = param_name ]metric_type: counter / gauge[ help: <string> ]labels:
[ - <label/variable> ]
<label/variable>
# derives from param<param>[ param_type: string / int / bool / timespan / datetime | default = int]# either label_name or param_name must be set[ label_name: <string> | default = param_name ]
Kenyan Royals is a charity platform with one goal, to get at least one person off the streets every day.
Kenyan royals is not based on the idea of calling for exclusive fundraisers or looking for the well off alone to help.
Kenyan royals is looking for anyone with Ksh 10 to spare everyday or weekly or when you can.
Simply the same amount you use to buy sweets can be used to get someone off the streets. Here’s how:
Wahenga walisema haba na haba hujaza kibaba(use google translate). If 1,000 of us was to contribute Ksh 10, that would be Ksh 10,000 raised, the approximate amount needed by Pato to start a mtumba shoes business.
Pato is just an example and the first person that this project is going to focus on helping.
But there are many other’s out there with different stories and reasons why they sleep outside or hungry.
We would all love a home to go to and that’s what we aim to provide, but a home without a means to eat and pay for the home is not enough,
the aim of this project is to collect enough cash to get these people a house and a small business. This would enable them to stay standing when we help them app.
This is not the only concern as there are those who are disabled, we get them a wheel chair or another means that they need to work in our society,
These are some essentials that we only expect our politicians to do and very few are lucky to get such a favour, we seek to help as much people as we can and not by bankrupting ourselves.
All am asking is for each and everyone to contribute an amount that will never hurt your budget. Ksh 10 is just a recommendation, if you can do better, do it.
We do not seek to help just one person so we don’t recommend on you putting all your money on one person, please let’s all contribute to help multiple individuals.
This program takes any audio/video file, extracts audio, separates vocal and instrumental tracks, applies a RVC model to vocals and re-mix them with the instrumental.
You’ll need just at least one RVC model ( find some here and extract zip file ) store them in a folder, find an input file and you’re OK!
Features
Generate from video/audio file (any format)
Generate from youtube link
Pitch shift the instrumental if the rvc voice has pitch shift too
Fix pitch unconsistencies between vocal & instru when pitcshifting
Do not run separation if output files already exist.
Automatically find original pitch and fit the rvc model pitch ( if possible )
Config file option to get instrumental and vocal audio file in same dir as original file
Edit audio separator models
Convert output file to same format as input (if audio, else use mp3)
Requirements
Note: On Windows, install preferably these dependencies with Microsoft store
python 3.10
pip
ffmpeg (dont forget on Windows to add the evironment variable )
git
Windows only C++ 14 Destktop development tools here
Installation
git clone the repo
cd rvcRemix
(optional) you can create a python virtual environnement to avoid the project python libraries to interfere with the ones already present on your system
run python -m venv venv
linux
then source venv/bin/activate
windows
if python has not yet the permission to run scripts, run in an admin powershell window : Set-ExecutionPolicy -ExecutionPolicy RemoteSigned -Scope CurrentUser
then .\venv\Scripts\Activate.ps1 (if you’re using powershell) or venv\Scripts\activate (if you’re using cmd)
pip install -r utils/requirements.txt
Configure
edit the file utils/config.json with a text editor and change the sections :
"modelsPath" : "a path to a folder" with the path to the folder you put your models in (preferably each model in its subfolder)
"workingDir" : "a path to a folder" with the path to the folder where the temporary files will be put
"mode" : "cpu" with the mode to use, “cpu” or “cuda”
"keepTempFiles" : false wether or not to keep intermediate temp files
"copySeparatedFiles" : true wether or not to copy separated file in the same directory as input; if existing, separation will not be done
Running
if you created a virtual environnement linux
run command source venv/bin/activate
windows
run command .\venv\Scripts\Activate.ps1 in a powershell
to process a single file, run command :
python run.py "path to the audio file" keyword_of_the_rvc_model pitch(optional)
to process multiple files, run command :
python run.py --bulk "path_to_your_bulk_file.json" . File utils/bulk_remix.json provides an example.
coredis is an async redis client with support for redis server, cluster & sentinel.
The client API uses the specifications in the Redis command documentation to define the API by using the following conventions:
Arguments retain naming from redis as much as possible
Only optional variadic arguments are mapped to variadic positional or keyword arguments.
When the variable length arguments are not optional (which is almost always the case) the expected argument
is an iterable of type Parameters or Mapping.
Pure tokens used as flags are mapped to boolean arguments
One of arguments accepting pure tokens are collapsed and accept a PureToken
Responses are mapped between RESP and python types as closely as possible.
For higher level concepts such as Pipelines, LUA Scripts, PubSub & Streams
abstractions are provided to encapsulate recommended patterns.
See the Handbook
and the API Documentation
for more details.


