![]()

LRT is a scheduler for long-running tasks inside browsers and Node.JS.
- API to split long-running tasks into units of work via Iterator protocol
- Ability to run multiple long-running tasks concurrently with coordinating their execution via coopeative scheduling
- Ability to abort outdated tasks
- Ability to specify chunk budget and maximize its utilization
- Built-in set of predefined chunk schedulers
- Ability to implement custom chunk scheduler
- Supports generators for tasks splitting
- Works in both Browser and Node.JS platforms
- Small, fast and dependency-free
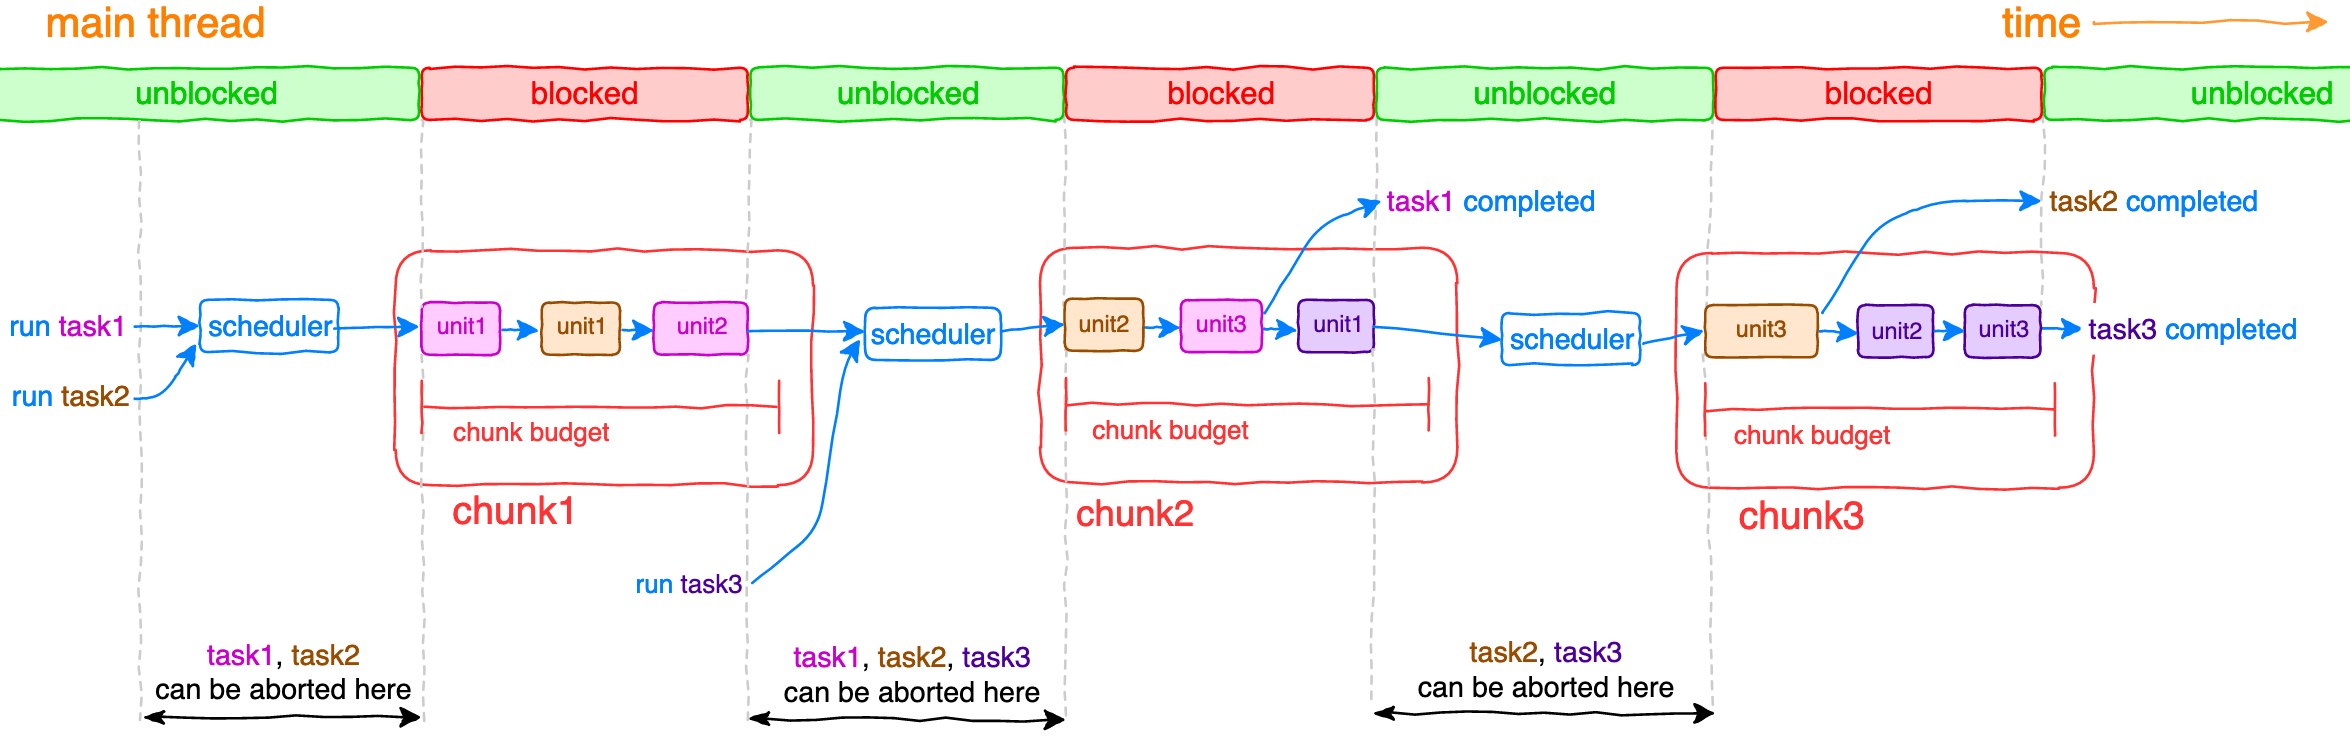
The main idea is to split long-running tasks into small units of work joined into chunks with limited budget of execution time. Units of works are executed synchronously until budget of current chunk is reached, afterwards thread is unblocked until scheduler executes next chunk and so on until all tasks have been completed.

$ npm install lrt
Note: LRT requires native Promise and Map so if your environment doesn’t support them, you will have to install any suitable polyfills as well.
// with ES6 modules
import { createScheduler } from 'lrt';

// with CommonJS modules
const { createScheduler } = require('lrt');const scheduler = createScheduler(options);options(object, optional)options.chunkBudget(number, optional, default is10) An execution budget of chunk in milliseconds.options.chunkScheduler(string|object, optional, default is'auto') A chunk scheduler, can be'auto','idleCallback','animationFrame','immediate','timeout'or object representing custom scheduler.
Returned scheduler has two methods:
const task = scheduler.runTask(taskIterator)Runs task with a given taskIterator and returns task (promise) resolved or rejected after task has completed or thrown an error respectively.scheduler.abortTask(task)Aborts task execution as soon as possible (see diagram above).
Scheduler is responsible for tasks running, aborting and coordinating order of execution of their units. It accumulates statistics while tasks are being run and tries to maximize budget utilization of each chunk. If a unit of some task has no time to be executed in the current chunk, it will get higher priority to be executed in the next chunk.
Task iterator should be an object implementing Iterator protocol. The most convenient way to build iterator is to use generators (calling a generator function returns a generator object implementing iterator protocol). Another option is to build your own object implementing iterator protocol.
Example with generator:
function* generator() {
    let i = 0;

    while(i < 10) {
        doCurrentPartOfTask(i);
        i++;
        yield;
    }

    return i;
}

const iterator = generator();
Example with object implementing iterator protocol:
const iterator = {
    next(i = 0) {
        doCurrentPartOfTask(i);

        return {
            done: i < 10,
            value: i + 1
        };
    }
};
For convenience LRT passes a previous value as an argument to the next method. The first next call doesn’t obtain this argument and default value can be specified as an initial one.
Chunk scheduler is utilized internally to schedule execution of the next chunk of units. Built-in options:
'auto'(by default) LRT will try to detect the best available option for your current environment. In browsers any of'idleCallback'/'animationFrame'/'postMessage'option will be used depending on their availability, or'immediate'inside NodeJS. If nothing suitable is available,'timeout'option will be used as a fallback.'idleCallback'LRT will try to use Background Tasks API. If it’s not available,'timeout'option will be used as a fallback.'animationFrame'LRT will try to use requestAnimationFrame. If your tasks need to change the DOM, you should use it instead'auto'or'idleCallback'. If it’s not available,'timeout'option will be used as a fallback.'postMessage'LRT will try to use postMessage. If it’s not available,'timeout'option will be used as a fallback.'immediate'LRT will try to use setImmediate. If it’s not available,'timeout'option will be used as a fallback.'timeout'LRT will use setTimeout with zero delay.
Also you can specify your own implementation of scheduler.
Custom scheduler should implement two methods:
request(fn)(required) Accepts functionfnand returnstokenfor possible aborting viacancelmethod (if it is specified)cancel(token)(optional) Acceptstokenand cancels scheduling
For example, let’s implement scheduler which runs next chunk of units in ~100 milliseconds after previous chunk has ended:
const customChunkScheduler = {
    request: fn => setTimeout(fn, 100),
    cancel: token => clearTimeout(token)
};

const scheduler = createScheduler({
    chunkScheduler: customChunkScheduler
});What if unit takes more time than chunk budget?
More likely this means that chunk budget is too small or you need to split your tasks into smaller units. Anyway LRT guarantees at least one of units of some task will be executed within each chunk.
Why not just move long-running task into Web Worker?
Despite the fact that Web Workers are very useful, they do have a cost: time to instantiate/terminate workers, message latency on large workloads, need for coordination between threads, lack of access the DOM. Nevertheless, you can use LRT inside Web Worker and get the best of both worlds: do not affect main thread and have ability to abort outdated tasks.
// Create scheduler
const scheduler = createScheduler();

// Imitate a part of some long-running task taking 80ms in the whole
function doPartOfTask1() {
    const startTime = Date.now();

    while(Date.now() - startTime < 8) {}
}

// Imitate a part of another long-running task taking 100ms in the whole
function doPartOfTask2() {
    const startTime = Date.now();

    while(Date.now() - startTime < 5) {}
}

function* task1Generator() {
    let i = 0;

    while(i < 10) { // 10 units will be executed
        doPartOfTask1();
        i++;
        yield;
    }

    return i;
}

function* task2Generator() {
    let i = 0;

    while(i < 20) { // 20 units will be executed
        doPartOfTask2();
        i++;
        yield;
    }

    return i;
}

// Run both tasks concurrenly
const task1 = scheduler.runTask(task1Generator());
const task2 = scheduler.runTask(task2Generator());

// Wait until first task has been completed
task1.then(
    result => {
        console.log(result); // prints "10"
    },
    err => {
        console.error(err);
    }
);

// Abort second task in 50 ms, it won't be completed
setTimeout(() => scheduler.abortTask(task2), 50);
https://github.com/dfilatov/lrt